Secure SSH access with cheap HSM
If you need to manage multiple Linux servers, secure use of ssh on a large scale is a challenge. The most commonly used authentication method (except passwords, of course) is using SSH key pairs. It’s difficult to manage many keys for multiple administrators, and in particular to ensure good private keys security. Using ssh keys for authentication requires copying the public key to every server you need login to. Therefore, there’s a challenge when you need to quickly remove a given public key from all authorized_keys files on all servers in case of suspicion of compromising the private key or even terminating cooperation with a given admin.
One of the solution is to use OpenSSH Certificate Authentication. OpenSSH supports login using special certificates signed by Certificate Authority (CA). Such a certificate contains the public key, identity and validity period. This solution allows installation on any server to which we will log in only one public CA key instead of multiple public keys - for each administrator. The entire user management process can now take place in one place instead of being distributed, as is the case with classic SSH key pairs. This solution is used by major organizations, e.g. Facebook.
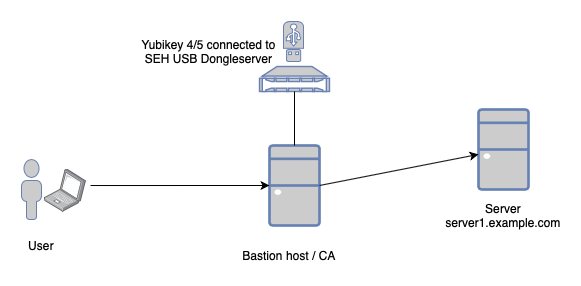
Here I will show how to configure a bastion host containing CA, through which you’ll connect to your servers. We’ll solve the problem of secure private key storage with a cheap USB dongle - Yubikey 4 or Yubikey 5. Yubikey provides the Smart Card capabilities based on the PIV (Personal Identity Verification) interface. Supports e.g. RSA 2048, ECC p-256, or ECC p-384.
If our bastion host isn’t a physical machine containing USB ports, then we need to use a solution that allows connecting USB keys via the IP network. We can use USB Dongle Server myUTN series from SEH. They offer solutions that allow connecting 2 to 20 USB ports over an IP network. Connections can be encrypted. Drivers for all major operating systems are available.
Yubikey 5 NFC costs $45 and myUTN-50a is $186, so we can have our “Hardware Security Module” (HSM) for about $231. If you want a cheaper alternative, then you can place a bastion host on a Raspberry PI, to which you will directly connect Yubikey, without any USB dongle server.
It’s an alternative for those who for various reasons cannot or do not want to use HSM cloud solutions, such as AWS Cloud HSH or Google Cloud HSM. Especially if you want to have your private keys under your sole control.
The basic idea
The user logs on to the bastion host. There, it generates a temporary CA certificate using Yubikey. With it, he can log in to the remote host. Such a certificate has a limited validity period (e.g. 10 minutes). This time determines when he can establish a new connection to the target server(s), which is of course not terminated after it has expired. The private key for generating the certificate is created and stored only on Yubikey. It cannot be recovered from it. You can only use it with access to Yubikey. Additional security may be the requirement to provide a PIN code each time the temporary certificate is generated. Incorrect PIN entry three times blocks Yubikey until you use the PUK code.
Bastion host configuration
All the following examples are to be performed on CentOS/RHEL 8 and Ubuntu 19.10. We couldn’t use Ubuntu 18.04 LTS because in version 7.6p1 OpenSSH PKCS#11 interface does not support ECC.
IP addressing in the examples below:
| Hostname | IP | Description |
|---|---|---|
| sshca1 | 10.10.0.10 | Bastion Host |
| utn1 | 10.10.1.100 | USB access through myUTN |
| server1 | 10.10.2.20 | server1.example.com (host to which we want access) |
Installing the SEH Dongle server drivers
If you have Yubikey connected directly to a physical machine (e.g. Raspberry PI) then you don’t need a dongle server.
Drivers can be found here. An SEH Dongle server requires configuration (access settings, IP addresses, etc.). This can be done via the web interface. Instructions are available on the drivers download page above.
There are four installation packages: driver, service, clitool (command line interface tool ‘utnm’) and manager (graphical user interface). We need to install the first three: driver, service and clitool. At the time of writing, the latest SEH driver version was 3.2.2.
Installation on CentOS/RHEL 8:
sudo dnf install epel-release
sudo dnf install kernel-devel make dkms unzip usbutils

wget https://www.seh-technology.com/fileadmin/user/downloads/deviceserver/tools/sehutnmanager-rpm_linux_64bit-3.2.2.zip
unzip ./sehutnmanager-rpm_linux_64bit-3.2.2.zip
cd sehutnmanager-rpm_linux_64bit-3.2.2
sudo dnf install ./seh-utn-driver-3.2.2-1dkms.noarch.rpm
sudo dnf install ./seh-utn-service-3.2.2-1.x86_64.rpm
sudo dnf install ./seh-utn-clitool-3.2.2-1.x86_64.rpm
Installation on Ubuntu 19.10:
sudo apt-get install linux-headers-`uname -r`
sudo apt-get install dkms unzip

wget https://www.seh-technology.com/fileadmin/user/downloads/deviceserver/tools/sehutnmanager-deb_linux_64bit-3.2.2.zip
unzip ./sehutnmanager-deb_linux_64bit-3.2.2.zip
cd sehutnmanager-deb_linux_64bit-3.2.2/
sudo dpkg -i ./seh-utn-driver_3.2.2-1dkms_all.deb
sudo dpkg -i ./seh-utn-service_3.2.2-1_amd64.deb
sudo dpkg -i ./seh-utn-clitool_3.2.2-1_amd64.deb
We assume that you have given the IP address 10.10.1.100 for USB access in myUTN and put Yubikey on port 1 myUTN. To check connectivity (you can wait a few moments for the answer), type:
sudo utnm -c "getlist 10.10.1.100"
Port VID    PID    Manufacturer                  Product
---- ------ ------ ----------------------------- -----------------------------
1    0x1050 0x0407 Yubico                        Yubikey 4 OTP+U2F+CCID


Port State           Owner                     Class Port name
---- --------------- ------------------------- ----- -------------------------
1    Not activated                             0x00
If you see Yubikey on the list, you can activate it on port 1, which will connect it to our Linux system:
sudo utnm -c "activate 10.10.1.100 1"
After waiting a few seconds, let’s check if Yubikey is visible on our Linux. Yubico USB Vendor ID is 1050:
[pawel@sshca1 ~]$ lsusb | grep 1050:
Bus 001 Device 003: ID 1050:0407 Yubico.com Yubikey 4 OTP+U2F+CCID
If you have Yubikey visible in the system, you can activate USB port permanently and restart server. After reboot you need to check (lsusb), whether Yubikey is visible.
sudo utnm -c "set autoconnect=true 10.10.1.100 1"
sudo reboot
Generation of private key and certificates on Yubikey
The Yubikey Series 4 and 5 have the PIV subsystem (FIPS 201 US government standard) provided RSA or ECC sign/encrypt operations using a private key stored on a built-in smartcard.
- Install the necessary packages
CentOS/RHEL 8:
At the time of writing, the yubico-piv-tool package for the EL8 family was in preparation. In case of unavailability in the official EPEL repository, you can download it from: https://copr.fedorainfracloud.org/coprs/jjelen/yubico-piv-tool/
sudo dnf install epel-release
sudo dnf install opensc yubico-piv-tool
CentOS/RHEL 8 requires you to define which non-root user or group will have access to the smartcard. So create the ssh_admins group and allow its members access to the smartcard via the pcsc interface:
sudo groupadd ssh_admins
sudo usermod -a -G ssh_admins pawel


sudo cat > /usr/share/polkit-1/rules.d/sssd-pcsc.rules << 'ENDFILE'
// access for smart card for ssh_admins group

polkit.addRule(function(action, subject) {
    if (action.id == "org.debian.pcsc-lite.access_card" &&
        subject.isInGroup ("ssh_admins")) {
            return polkit.Result.YES;
    }
});

polkit.addRule(function(action, subject) {
    if (action.id == "org.debian.pcsc-lite.access_pcsc" &&
        subject.isInGroup ("ssh_admins")) {
            return polkit.Result.YES;
    }
});

ENDFILE
Restart server (or only polkit and pcscd services)
Ubuntu 19.10:
sudo apt-get install opensc yubico-piv-tool
- Check the connectivity through the pcsc interface:
[pawel@sshca1 ~]$ opensc-tool --list-readers
# Detected readers (pcsc)
Nr.  Card  Features  Name
0    Yes             Yubico Yubikey 4 OTP+U2F+CCID 00 00
- Check connectivity in yubico-piv-tool. If you don’t have any Yubikey certificates, you’ll see:
[pawel@sshca1 ~]$ yubico-piv-tool -a status
Version:        4.3.7
Serial Number:  5001234
CHUID:  No data available
CCC:    No data available
PIN tries left: 3
- To prevent C_Sign error during the generation of certificates using the pcsc libraries> = 0.18, as a temporary solution, add or uncomment in opensc.conf: pin_cache_ignore_user_consent = true; This should be placed in the ‘framework pkcs15’ section. The problem was only observed on CentOS/RHEL 8. On Ubuntu 19.10 you can skip this step.
[pawel@sshca1 ~]$ cat /etc/opensc.conf
app default {
        # debug = 3;
        # debug_file = opensc-debug.txt;
        framework pkcs15 {
                # use_file_caching = true;
                pin_cache_ignore_user_consent = true;
        }
        reader_driver pcsc {
                # The pinpad is disabled by default,
                # because of many broken readers out there
                enable_pinpad = false;
        }
}
Reset Yubikey PIV subsystem
If there is a need to reset the PIV system on Yubikey (e.g. there are some certificates, or there is a custom PIN/PUK), then we follow the instructions below. The standard PIN is 123456, PUK is 12345678 and the MGMT_KEY is 010203040506070801020304050607080102030405060708. PIV reset requires entering incorrect PIN and PUK values (i.e. only 0 digits) three times. Do not pay attention to messages like “Pin verification failed” when following the instructions below.
yubico-piv-tool -averify-pin -P000000
yubico-piv-tool -averify-pin -P000000
yubico-piv-tool -averify-pin -P000000
yubico-piv-tool -achange-puk -P000000 -N0000000
yubico-piv-tool -achange-puk -P000000 -N0000000
yubico-piv-tool -achange-puk -P000000 -N0000000
yubico-piv-tool -areset
Setting new PIN, PUK and MGMT_KEY
Generate and insert new PIN, PUK and MGMT_KEY codes into the ykeys.txt file in the temporary yubico directory. It’s best to use random values, but you can also set your own. MGMT_KEY will be needed once to authenticate during CA certificate generation.
mkdir -p ~/yubico
echo mgmt_key=`dd if=/dev/urandom bs=1 count=24 2>/dev/null | hexdump -v -e '/1 "%02X"'` > ~/yubico/ykeys.txt
echo pin=`dd if=/dev/urandom bs=1 count=6 2>/dev/null | hexdump -v -e '/1 "%u"' | cut -c1-6` >> ~/yubico/ykeys.txt
echo puk=`dd if=/dev/urandom bs=1 count=6 2>/dev/null | hexdump -v -e '/1 "%u"' | cut -c1-8` >> ~/yubico/ykeys.txt
After generation, the sample codes look like this:
[pawel@sshca1 ~]$ cat ~/yubico/ykeys.txt
mgmt_key=471DAF7AD19C9CF61D6979457357D8D3B5449DB37DABADE4
pin=219205
puk=64802189
Now set Yubikey with generated codes. We assume that PIN and PUK have default values:
source ~/yubico/ykeys.txt
yubico-piv-tool -a set-mgm-key -n $mgmt_key
yubico-piv-tool -k $key -a change-pin -P 123456 -N $pin
yubico-piv-tool -k $key -a change-puk -P 12345678 -N $puk
Generation of private keys and CA certificate on Yubico
Yubico PIV interface provides RSA or ECC sign/decrypt operations using a private key stored on the smartcard. Supports key sizes of RSA 2048 or ECC p-256, or ECC p-384. We’ll generate a ECC p-384 keypair. The private key stays on Yubikey, and the public key is saved to the file ~/yubico/ca-pubkey.pem:
source ~/yubico/ykeys.txt
yubico-piv-tool -s 9c -A ECCP384 -a generate -k$mgmt_key -o ~/yubico/ca-pubkey.pem
You’ll now generate a new x509 ECC p-384 certificate for our CA valid for 10 years based on a previously generated key pair and save to file ~/yubico/ssh-x509-cert.pem. You have to provide the PIN code (e.g. 219205) that you generated earlier:
ca_subj="/C=PL/ST=LD/L=Lodz/O=Secure Access Inc./OU=IT/CN=ssh_ca/"
yubico-piv-tool -a verify-pin -a selfsign-certificate -s 9c -S "$ca_subj" --valid-days 3650 -i ~/yubico/ca-pubkey.pem -o ~/yubico/ssh-x509-cert.pem
Import the generated CA certificate into Yubikey:
yubico-piv-tool -k$mgmt_key -a import-certificate -s 9c < ~/yubico/ssh-x509-cert.pem
Check the PIV content of our Yubikey. The CA certificate is visible now in slot 9c:
[pawel@sshca1 ~]$ yubico-piv-tool -a status
Version:        4.3.7
Serial Number:  5001234
CHUID:  No data available
CCC:    No data available
Slot 9c:
        Algorithm:      ECCP384
        Subject DN:     C=PL, ST=LD, L=Lodz, O=Secure Access Inc., OU=IT, CN=ssh_ca
        Issuer DN:      C=PL, ST=LD, L=Lodz, O=Secure Access Inc., OU=IT, CN=ssh_ca
        Fingerprint:    b812ee13f6acf78e5a91fd2c36bc230a40fbc87f0f1ba1d4a9f2827929d19979
        Not Before:     Feb  6 12:24:00 2020 GMT
        Not After:      Feb  3 12:24:00 2030 GMT
PIN tries left: 3
Now generate the ssh public key in RFC4716 format (required by OpenSSH) for the previously generated CA certificate and save it to the file ~/yubico/ssh-ca.pub. Use the PKCS11 interface to access Yubikey. Check the location of the opensc-pkcs11.so libraries beforehand.
CentOS/RHEL 8:
ssh-keygen -D /usr/lib64/opensc-pkcs11.so -e >> ~/yubico/ssh-ca.pub
Ubuntu 19.10:
ssh-keygen -D /usr/lib/x86_64-linux-gnu/opensc-pkcs11.so -e >> ~/yubico/ssh-ca.pub
You now have the ssh ca public key:
[pawel@sshca1 ~]$ cat ~/yubico/ssh-ca.pub
ecdsa-sha2-nistp384 AAAAE2VjZHNhLXNoYTItbmlzdHAzODQAAAAIbmlzdHAzODQAAABhBP/tkJYihhSactl9dmhBwY6xz3bEohmGBr40RL8ZZiHyFJZKsdoqPdvNfVLx/Uz4wbHAlzwE1EyGN63V7l2OP9jZrRL+nKZriE4zkq3a/kiyjkfKnb6juws/tEn68wXf1g== pkcs11:id=%02;object=SIGN%20pubkey;token=ssh_ca;manufacturer=piv_II?module-path=/usr/lib64/opensc-pkcs11.so
For identification purposes, you can add or change the public key label generated by ssh-keygen to one containing the Yubikey serial number (e.g. Y5001234). CentOS/RHEL ssh-keygen adds label “pkcs11:id=%02;object=SIGN%20pubkey;token=ssh_ca;manufacturer=piv_II?module-path=/usr/lib64/opensc-pkcs11.so”, and Ubuntu doesn’t add any.
Adding a label can be useful if you have more than one bastion server, each with its own dedicated Yubikey.
You will copy ssh-ca.pub file to every host you want to access.
[pawel@sshca1 ~]$ cat ~/yubico/ssh-ca.pub
ecdsa-sha2-nistp384 AAAAE2VjZHNhLXNoYTItbmlzdHAzODQAAAAIbmlzdHAzODQAAABhBP/tkJYihhSactl9dmhBwY6xz3bEohmGBr40RL8ZZiHyFJZKsdoqPdvNfVLx/Uz4wbHAlzwE1EyGN63V7l2OP9jZrRL+nKZriE4zkq3a/kiyjkfKnb6juws/tEn68wXf1g== Y5001234
Save the contents of the ~/yubico/ykeys.txt file to a safe place and delete the file itself for safety. The PIN code is best to remember - it will always be used when accessing remote hosts via ssh. The PUK code will be used if the PIN code is incorrectly used three times.
Secure file deletion:
shred -u ~/yubico/*.txt
shred -u ~/yubico/*.pem
Preparing a remote server for access from the bastion host
- Copy the file ~/yubico/ssh-ca.pub from the bastion host to the target server (server1.example.com):
#commands executed on the bastion host
scp ~/yubico/ssh-ca.pub server1.example.com:~
- Log in to the remote server (eg server1.example.com). Then copy the ssh-ca.pub file to the /etc/ssh/ directory, add the line with TrustedUserCAKeys to the /etc/ssh/sshd_config file and restart openssh:
#commands executed on the remote server
sudo mv ~/ssh-ca.pub /etc/ssh/
sudo chown 0:0 /etc/ssh/ssh-ca.pub
sudo echo TrustedUserCAKeys /etc/ssh/ssh-ca.pub >> /etc/ssh/sshd_config
sudo systemctl restart sshd
Establishing an ssh connection to a target server from the bastion host
You will use the ed25519 key signed with the CA ECC p384 certificate to log in.
- Generate ed25519 key pair (once)
[pawel@sshca1 ~]$ ssh-keygen -t ed25519
Generating public/private ed25519 key pair.
Enter file in which to save the key (/home/pawel/.ssh/id_ed25519):
Enter passphrase (empty for no passphrase):
Enter same passphrase again:
Your identification has been saved in /home/pawel/.ssh/id_ed25519.
Your public key has been saved in /home/pawel/.ssh/id_ed25519.pub.
The key fingerprint is:
SHA256:RgDRmUO4J6DOHuUfzmIBYJxn/Vwmkz1fV1TDwswucGo pawel@sshca1
The key's randomart image is:
+--[ED25519 256]--+
|. . +*ooo   + .o*|
|.+.o..== * . * o.|
|o.o. .o.* * o o  |
|.. .o .+ E o .   |
|o +  o  S   .    |
| + o . .         |
|. . = .          |
| . o +           |
|  . .            |
+----[SHA256]-----+
- Read the CA public key from Yubikey to the file ~/.ssh/ssh-ca-local.pub. It has the same content as ssh-ca.pub, but can contain only one entry for a connected Yubikey. (once)
CentOS/RHEL 8:
ssh-keygen -D /usr/lib64/opensc-pkcs11.so -e > ~/.ssh/ssh-ca-local.pub
Ubuntu 19.10:
ssh-keygen -D /usr/lib/x86_64-linux-gnu/opensc-pkcs11.so -e > ~/.ssh/ssh-ca-local.pub
- Generate a temporary certificate for remote ssh access
Before each remote login you will generate a temporary certificate, valid for a short period of time (e.g. 10 minutes), which will use your private key ed25519 signed by CA ECC p384 certificate. During the certificate validity period you will be able to log in to all hosts where you have added the CA public key (in the TrustedUserCAKeys parameter). In the following example:
- -I (certificate_identity) parameter contains the login name of the current user (e.g. pawel)
- -n (principals) containst one or more principals to be included in a certificate (in this case - root)
- -V (validity_interval) 10 minutes
- -z (serial_number) generation time in the yymmddhhmmss format
You must provide the PIN when generating the certificate. The following command generates a temporary certificate to the ~/.ssh/id_ed25519-cert.pub file.
CentOS/RHEL 8:
[pawel@sshca1 ~]$ ssh-keygen -D /usr/lib64/opensc-pkcs11.so -s ~/.ssh/ssh-ca-local.pub -I $USER -n root -V +10m -z $(date +%y%m%d%H%M%S) ~/.ssh/id_ed25519.pub
Enter PIN for 'ssh_ca':
Signed user key /home/pawel/.ssh/id_ed25519-cert.pub: id "pawel" serial 200206144748 for root valid from 2020-02-06T14:46:00 to 2020-02-06T14:57:48
Ubuntu 19.10:
pawel@sshca1:~$ ssh-keygen -D /usr/lib/x86_64-linux-gnu/opensc-pkcs11.so -s ~/.ssh/ssh-ca-local.pub -I $USER -n root -V +10m -z $(date +%y%m%d%H%M%S) ~/.ssh/id_ed25519.pub
Enter PIN for 'ssh_ca':
Signed user key /home/pawel/.ssh/id_ed25519-cert.pub: id "pawel" serial 200206144748 for root valid from 2020-02-06T14:46:00 to 2020-02-06T14:57:48
Let’s watch the content of the generated certificate:
[pawel@sshca1 ~]$ ssh-keygen -L -f ~/.ssh/id_ed25519-cert.pub
/home/pawel/.ssh/id_ed25519-cert.pub:
        Type: [email protected] user certificate
        Public key: ED25519-CERT SHA256:RgDRmUO4J6DOHuUfzmIBYJxn/Vwmkz1fV1TDwswucGo
        Signing CA: ECDSA SHA256:7ZYK5ggHjyrD/cxOcp4orbKfZCh7xgQhcga6oE0/QXk (using ecdsa-sha2-nistp384)
        Key ID: "pawel"
        Serial: 200206144748
        Valid: from 2020-02-06T14:46:00 to 2020-02-06T14:57:48
        Principals:
                root
        Critical Options: (none)
        Extensions:
                permit-X11-forwarding
                permit-agent-forwarding
                permit-port-forwarding
                permit-pty
                permit-user-rc
- Finally, log in to the target host as root (principal included in the certificate):
[pawel@sshca1 .ssh]$ ssh server1.example.com -l root
Last login: Thu Feb  6 14:49:25 2020 from 10.10.0.10
[root@server1 ~]#
The sshd log on the target server shows ID (pawel), serial (200206144748), bastion host’s IP address (10.10.0.10):
Feb 6 14:51:05 lab8a sshd[1716]: Accepted publickey for root from 10.10.0.10 port 39858 ssh2: ED25519-CERT SHA256:RgDRmUO4J6DOHuUfzmIBYJxn/Vwmkz1fV1TDwswucGo ID pawel (serial 200206144748) CA ECDSA SHA256:7ZYK5ggHjyrD/cxOcp4orbKfZCh7xgQhcga6oE0/QXk
If the validity period of the id_ed25519-cert.pub has expired, using the ssh -l root server1.example.com command will take you to the next authentication method - e.g. password prompt. Then we need to generate a new temporary certificate.
Final thoughts
It is critical to ensure the bastion host’s security. It’s definitely worth using multi-factor authentication and good event logging system. This is obvious.
Next, allow to use ssh connections on each remote server only from the bastion host(s).
You can run more bastion hosts for high availability. Each connected to its own Yubikey.
The distributed ssh-ca.pub file can contain more entries - one line for each CA.